


Rhapsody3
RISCWorld
Chapter 10
10.1 Formatting
Before you can print your score it must be formatted - that is to say, Rhapsody must work out where all the page breaks are going to come etc. In order to do this, Rhapsody needs to know what printer driver you are going to use so the first thing to do is load a printer driver ! Rhapsody is compatible with all standard RISC OS printer drivers.
Next, select the Format option on the Score menu and the following window will appear:
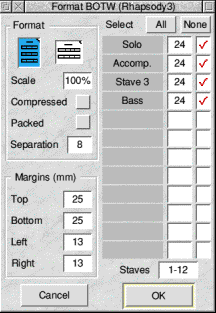
Initially it is assumed that you wish to format and print all the parts so every stave is ticked on the right hand side.
On the left are two boxes containing various icons which control the way the score is formatted. In the first box are two icons which represent Portrait (upright) and Landscape (sideways) printing.
Below these is an icon which sets the Scale from 50% to 150% in steps of approximately 4%.
Next are a pair of icons which squash the score in various ways. The first - Compressed - simply reduces the horizontal scale. This has the additional effect of compressing all the notes, clefs, text etc. Compression may be useful when printing a full score but it is not recommended for performing parts.
The second icon - Packed - does exactly the same as the Block pack routine (see page 74) except that the effect does not alter the music data in any way. In effect, instead of using the slot widths stored in the score, Rhapsody recalculates them using a different rule. The snag with this is that if you have 'tweaked' any of the slot widths in the score, your efforts will be ignored. If you must have perfection, first pack the whole score using the Block pack option; then do your tweaking; finally print the score without packing .
Note that you can format a selection of staves with or without packing, but in both cases, Rhapsody has to work out the slot widths from scratch. It is not possible, therefore, to 'tweak' the slot widths of an individual stave. For example, suppose a part has a long run of short notes which you want to pack very close together. When you print out the whole score, all will be well; but when you print out just this stave, Rhapsody will restore all the slot widths back again. The way to get round this problem is to duplicate the score, delete the unwanted staves and print out what is left.
At the bottom of the box, you can specify the minimum separation between the systems of staves on the page. This is in the same units as the stave height.
In the second box are four icons which determine the margins on the printed page. These margins refer to the regions outside the actual staves themselves. Allowance must be made on the left for abbreviated stave names and all round for phrase marks and other things which can extend a little way beyond the actual slot boundaries.
On the right is a list of all the staves. By clicking on the red ticks, you can make a selection of staves to format and print. If you have got a lot of staves, this is made a little easier by providing two icons which select All or None respectively. If your score has more than 12 staves, the icon at the bottom will turn up a new page of 12 staves. The number beside the stave name is the stave height - or rather, it is the sum of the upper and lower stave heights which are specified in the Reassign Stave window (see page 48). If you wish to spread the score out a bit when printing or squash it up a bit so that it will fit on a page, you can alter these settings. Note that this does not alter the data in the score in any way.
Whenever a score is formatted, the format settings are recorded and if you save your score at this point, the format settings will still be there when you reload it.
10.2 The Preview window
Once you are satisfied with the settings, clicking on the OK box will initiate the formatting process and bring up the Preview window which will look exactly the same as the final printed score. You can scroll up and down this window to see how your score fits. The chances are, you will want to improve some of your formatting settings in the Format window. After you have made the necessary changes, click on the OK box to reformat the score with the new settings
When Rhapsody is formatting, it tries to get as many bars on to a line as it can but there are a number of reasons why you may want to spread things out a bit. Once you have decided on a scale etc, you will no doubt find that there is extra usable space on the last page. You may also wish to arrange for a group of 10 bars rest to fall at the end of a page so as to give the player time to turn over. To achieve either of these things, choose a line which looks as if it has too many bars in it and click on it with the Menu button. This will reveal the following menu:
Select the Remove bar option and one bar will be removed from this line, pushing all the others down the page. Repeat this as many times as is necessary until your bars rest come at the end of the page or until the last page is padded out satisfactorily. If you change you mind about removing a bar you can use the Add bar option but you can't add a bar to a line which is already full. If you make a mess of things, you can always use Start again.
It is important to remember that when you add or remove a bar from a line, all of the score is reformatted from scratch. You cannot therefore decide at a late stage to remove one more bar from the first line without undoing all your hard work. You must work from the top of the score downwards. The results are worth the effort!
The scale of the preview window is already reduced but if you are working on a large score, you may find it more convenient to work with an even smaller scale. If so choose the Small option. Although the score may not be very readable, the bars should at least be recognisable.
10.3 The hot link with Scoredraw
If you have opened a directory containing ScoreDraw , the last item on the main score menu will be unshaded and clicking on it will bring up exactly the same formatting window but when you click on OK, ScoreDraw will be loaded, memory permitting, and the score will be passed to it along with the formatting information. ScoreDraw will convert the file into a Draw file which you can edit further if need be. Even without any further editing, a considerable improvement in print quality will be achieved when the Draw file is printed.
10.4 Printing
Finally, we come to the Print option which brings up the following window:
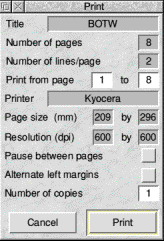
All the data in the grey icons is for information only. The other icons are self-evident and when you are sure that everything is ready, click on the Print icon.
Printing can be one of the most frustrating parts of getting to know a new program and it would be wise to try printing a few test scores before trying to print out a whole symphony. In the first place, printing is a slow business (and the RISC OS 3 printer drivers are if anything slower than the old ones.) If nothing seems to happen at first, be patient. If things genuinely go wrong, press <Escape>.
Apart from the obvious things like not loading a printer driver, nothaving the printer On-line or not having it connected even, one thing that can cause problems is not allocating enough space in the Relocatable Module Area or RMA . You can increase the memory allocated using the Task Manager window . (You should aim to have a block of at least 64k free.)
Other problems include blank lines between every pass of the print head. If this happens, check that the printer is set so that it does not generate extra line feeds of its own. Changing this usually means changing the DIP switches.
If some of the staves have some of their horizontal stave lines missing, you must use a higher print resolution. Obviously a laser printer will give the best results but a 300 x 300 dpi bubble jet printer will produce quite superb quality print.
RISCWorld